

To build a computer
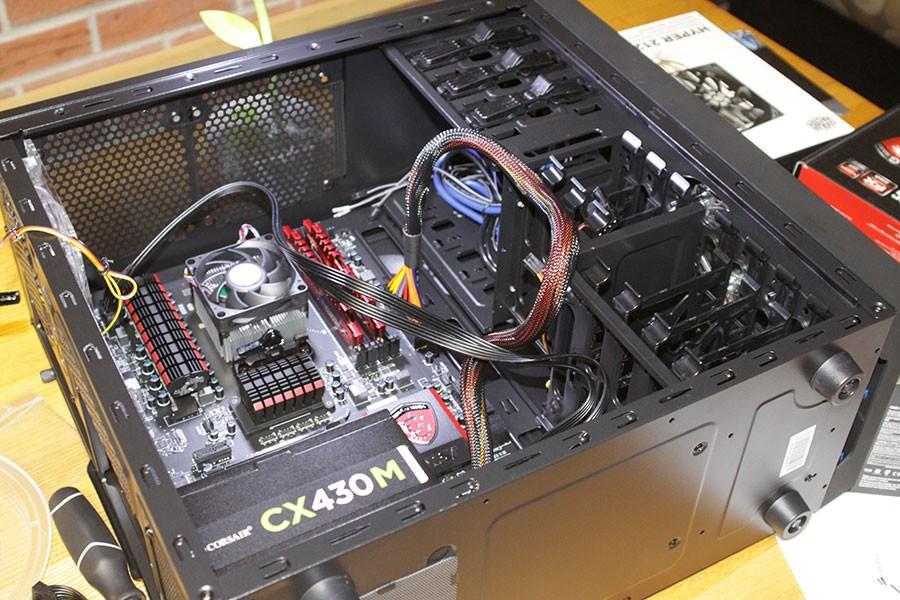
Inner bits, mid-assemblage
Until now, I’ve only ever owned a Mac, which meant I never had to learn much about hardware because even if I did, I wouldn’t have been able to do anything about it. I know a fair amount about software, but I really only have one important skill: Googling. So if I can build my own computer, rest assured that you can too.
The first step is to decide what you really want to focus on. The beauty of building your own computer is that it can be customized toward the configuration that will best suit your needs. You can optimize your system for editing video, running a lot of programs at once, or simply being the best it can be at browsing the web. However, like most people who choose to build their own rig rather than buying one premade, I was looking for something that could handle all of the gaming that my MacBook Pro absolutely could not.
The second step, although many people may already have this in mind when they begin, is to figure out your price range. How much you’re willing to spend is a key factor in which components you should be looking at. It’s no good oohing and ahhing over a GeForce GTX TITAN video card, which runs upward of $1,000, if the budget for your entire build is $500.
If you don’t know much about computer components, it might benefit you to leave a little bit of wiggle room in your budget. You might start out thinking that you want to stay under $300, but then realize that you won’t be able to play “Fallout 4” and decide you need to go bigger.
When I decided that I wanted to build a gaming computer and began doing the research, I had no idea what I was looking for. Luckily for me, and for anyone else in that boat, a lot of people have put together guides online. If you’re not too into customization, it’s ridiculously easy to just Google something like “$500 gaming pc build 2016” — you’ll want to add the year so that you don’t get outdated guides whose parts may not even be available anymore — and find multiple guides that will work perfectly well. If you want to just pick one and build it, that’s fine. If you want more customization than that, it’s an excellent jumping-off point.
Once I had read a few different guides (“a few” being somewhere around 20), I had a better idea of what components I might be looking for. I chose one guide that seemed close to what I wanted, and then I plunked all of its components into pcpartpicker.com.
As a new builder, I found pcpartpicker.com to be an invaluable resource. It doesn’t actually pick the parts for you, despite the name, but it does allow you to compile all of your components in one place and will tell you where you can find each part for the least amount of money. Additionally, it will alert you if any of your parts are incompatible and has an extremely convenient search function that allows you to compare parts on the fly before adding them to your build.
If you’re building a gaming computer, it’s likely that your build will be constructed around your graphics card, also known as the video card or GPU (graphics processing unit). While the CPU (central processing unit) and RAM (random access memory) are also important, the three have to be balanced in order to be efficient, and the GPU is the largest determinant of whether or not your computer will be able to handle a game.
In my build, the GPU was the most expensive component by a large margin. I chose the Asus GeForce GTX 960 4GB, although I encountered many differing opinions on whether or not it was worth it. The GTX 960 is usually only a 2GB card, meaning that the card itself has 2GB of memory, and there is some debate about whether or not it can even process the extra 2GB. Some people report a better framerate with the 4GB, while others say it’s not worth it and you’d do better to jump up to the GTX 970. However, with the 960 4GB coming in around $210 (at the time of my build) and the 970 costing about $100 more, I decided to go with the 4GB and hope that it was worth it. (I have since been told that it probablyThe GPU that I chose works well running most games at 1080 resolution. Since the monitor that I chose was only 1080 itself, there would have been little point in getting a GPU that could handle more than that, unless I thought I might upgrade to a larger monitor before I wanted to upgrade my graphics card.
GPUs and motherboards are nearly universally compatible; CPUs and motherboards are not. You’ll need to either do a little bit of research into whether you want an Intel or an AMD processor, because that will determine which motherboards you should be looking at. Alternatively, you can just go with the CPU and motherboard that whatever guide you’re reading has suggested.
The CPU determines how quickly and ably your computer will process software, games, and any other things you ask of it. It usually follows that better CPUs are more expensive, so — as with most of the components — you’ll have to balance your budget with the amount of processing power that you want your computer to have. For my build, I chose the AMD FX-6300 3.5GHz 6-Core processor.
Once you’ve chosen a CPU that fits your needs (or wants), you should choose a motherboard that’s compatible. As far as I can tell, at least with gaming computers, the specs of the motherboard itself don’t actually matter all that much. It is essentially just the backbone of the computer that you plug all of your other parts into. I went with the MSI 970 Gaming ATX AM3+ motherboard, because it was part of the guide I based my build on, had good reviews, and was compatible with my other parts. Some motherboards might have more or fewer USB ports, RAM slots, and the like, so if that’s important to you then it might be good to do a little bit more research.
RAM is a pretty easy component to add. It determines how many things your computer can have going simultaneously, but there isn’t too much variation. Most mid-range computers will do just fine with 8GB or 16GB of RAM. Your only real task is to choose a brand that sounds good to you, and make sure that it’ll fit on your motherboard. I ended up with two 4GB sticks of G.Skill Ripjaws X Series DDR3-1866 memory, for a total of 8GB of RAM.
A very important aspect of any computer is the storage. You have the choice of getting a normal hard drive (HDD), or buying a more expensive, but much faster, solid state drive (SSD). I opted for the best of both, buying a 120GB Kingston SSD to put my operating system (OS) on and a 1TB Western Digital HDD to store all of my games and other files.
You will also need to choose a power supply unit (PSU). Pcpartpicker.com will tell you approximately how much wattage your build will require, and you can then choose your PSU accordingly. PSUs have different ratings: bronze, silver, gold, and platinum. The better the rating, the more efficiently it will convert wall power to computer power. I went with a bronze-rated 430W PSU, which so far has served me just fine.
Once you’ve got all of your core parts chosen, you’ll have to choose a case to store them all in. This is mostly dependent on what you want your computer to look like, and thus is very much a style choice. You should also note the size of the case, and make sure that none of your components are too big to fit inside.
Finally, don’t forget to find peripherals. They won’t be mentioned in a lot of build guides, so you’ll have to take initiative. A fancy new computer won’t do you any good at all if you don’t have a keyboard, mouse, and monitor to go with it. These extra pieces can be a shocking addition to the cost, as well, if you forget to factor them in when choosing your other parts. These three parts in my build came to almost $200. The total cost for my build came to around $800, which means that I spent a little over $600 on the actual components.
After waiting the necessary amount of time for all of your parts to be delivered, it’s time for the exciting part: putting it all together. While this might seem like an intimidating or even infeasible task to those who have never done it, all you really need is a Philips screwdriver and plenty of common sense. The assembling process consists almost entirely of plugging connectors into their respective ports.
As with choosing the components, there are plenty of guides and YouTube videos that will tell/show you how to assemble your components. Alternatively, you can read all of your user manuals very carefully and figure it out for yourself. Ideally, you’ll go with a mix of the two, since online guides won’t usually tell you about your specific components, and the user manuals won’t really tell you what order you should assemble the parts in.
It would be shocking for a first-time builder to have no difficulties or mistakes, so don’t be discouraged if something doesn’t go quite right the first time. As long as all of your parts remain unbroken, you can probably still salvage your build.
I made plenty of my own mistakes. Once the CPU and RAM are attached to the motherboard, the board needs to be screwed into place in the case. I did this successfully, although not without difficulty, before realizing that I had failed to place the dust guard that fills the hole in the case around the motherboard’s ports. I tried fruitlessly to place it after the fact, but it isn’t meant to do that and I was forced to spend another twenty minutes taking up and then reattaching the motherboard.
If you’ve bought a separate cooler (also known as a heat sink) for your CPU, you needn’t bother attaching the one that comes with it. Unless, of course, you’re a silly person like me. I had to pry the stock cooler back off of my CPU — slightly difficult to do once the thermal paste has sealed it there — before I could go about attaching the new, larger cooler.
Once you’ve got all of your components assembled in the case, it would be wise to plug it in — even without a monitor attached — and make sure everything turns on all right. When I did this, my GPU displayed a red LED, which indicated that it wasn’t receiving enough power. This allowed me to realize that I hadn’t plugged the cable from the power supply into it and remedy the situation before it was actually a problem.
The next step is to set up your monitor and actually turn the computer on. Until you load an OS — whether it’s Windows or Linux — the only way you’ll be able to interact with your computer is through the BIOS (Basic Input/Output System), which is essentially just a way for you to check on your hardware and then boot an OS. Unless you’ve spent the money on a disc drive, you’ll need to find a digital copy of your OS that you can boot from a USB drive.
Creating a bootable USB is fairly simple, so long as you have a USB drive that’s at least 8GB and you have access to another computer with which to create it. A quick Google search will bring up plenty of instructions. Once you’ve done that, you just have to follow the instructions provided in your motherboard’s user manual to boot up your OS, and then wait for it to install.
The last technical step is to install all of the drivers that your motherboard and GPU require. These are just bits of software that allow your computer to recognize and utilize its installed hardware. It’s likely that you’ll need the driver for your ethernet port before you can use it to access the internet, which results in a bit of a chicken and egg conundrum if you don’t have another computer that you can use to download the driver.
If you’ve installed the driver and still can’t access the internet, don’t panic and troubleshoot for hours and finally assume that your ethernet port is fried and drive to Burlington to buy a USB-to-ethernet adapter for $25 at Best Buy. (No, that isn’t an oddly specific example. Why do you ask?) Instead, I would suggest going to IT and registering your computer’s MAC address so that it will be allowed on the school network.
The final step, if you’ve built this computer for gaming, is of course to download Steam and install any games you might have. If you don’t have any games yet, don’t worry: all you need to do is subscribe to Humble Bundle’s newsletter and I assure you, you’ll be broke and happily enjoying your library of 63 games within a few months.
Although I’ve always used a Mac, I’ve had little trouble acclimating to my new system. Using a new platform really isn’t as much of a hassle as the purists make it out to be, so long as you don’t get too hung up on the things it can’t do. The computer has played every game I’ve thrown at it — from Civilization V to The Sims 4 to Rocket League — and it’s played them well. I have a feeling that I’m going to get along with it for quite some time to come.